
SSD1306は300~400円程度で入手できる安価なOLEDディスプレイです。I2Cで制御できるため、Arduinoなどのマイコンでかんたんに動作させることができます。
当記事ではESP32でOLEDディスプレイ(SSD1306)を使用する方法を紹介していきます。基本からよくあるサンプルコードまで掲載していますので、ぜひご覧ください。
- ESP32 Devkit
- SSD1306(128×64)
- Visual Studio Code+PlatformIO
【重要】ちゃんとしたライブラリを選ぼう!
定番のOLEDディスプレイである「SSD1306」ですが、ESP32で正常に動作するライブラリを見つけるのに意外と苦労しましたので、詳しく解説しておきます。
おすすめのライブラリはthingpulse/ESP8266 and ESP32 OLED driver for SSD1306 displaysです。
thingpulse/ESP8266 and ESP32 OLED driver for SSD1306 displaysは、Platform IOが公式で提供しているライブラリの中でトップ100に入る人気のライブラリです。目立ったバグもなく安定して動作しますし、人気なだけあってネット上の情報が豊富なため、特段の理由がない限りこちらを使うのがよいでしょう。
SSD1306については、Google検索すると他のライブラリも多数ヒットします。しかし、バグが入っており正常に動作しないライブラリも少なくないようですので、注意したほうが良さそうです。
というのも、この記事を書いたのはバグだらけのライブラリを導入し、なかなかうまくいかなかったから。ヘッダーファイルの書き換えをしないと動作しないようなライブラリを選んでしまったがために、かなり時間をロスしてしまいました。ヘッダーファイルなど、ライブラリ自体の編集を要求するようなものは信頼性に欠けますので、選ばないようにしましょう。
とりあえず動かしてみよう!
まずはとにかく一度動かしてみましょう。GitHubに掲載されているコードを使用し、SSD1306でテスト表示してみます。
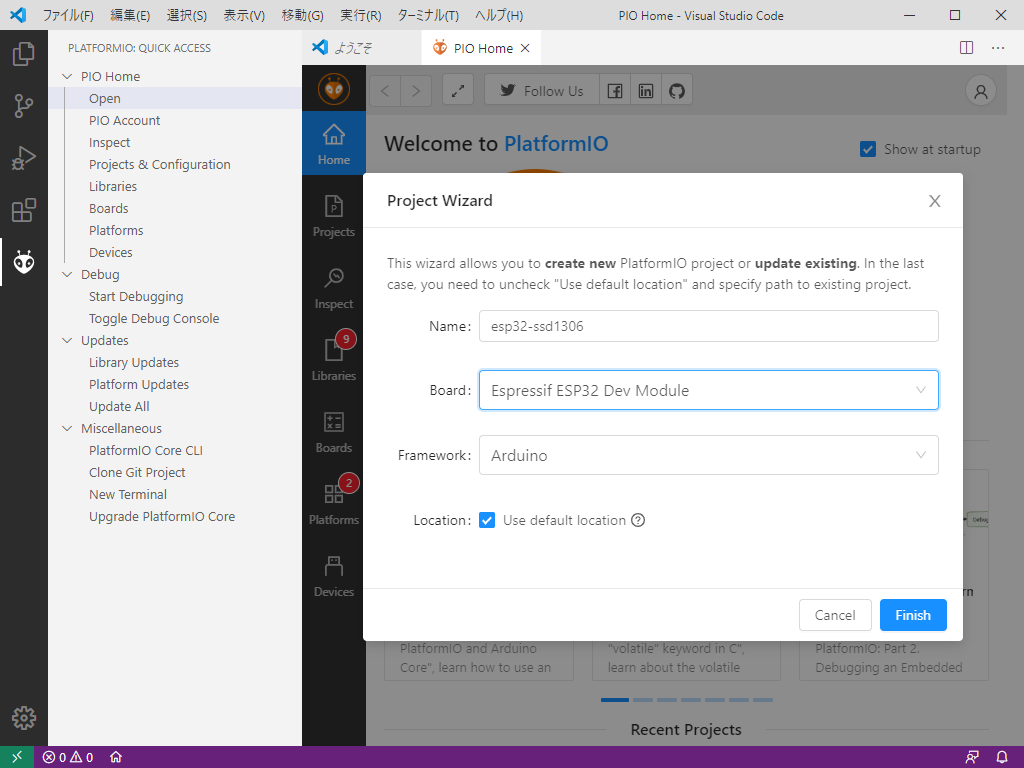
【STEP1】PlatformIOでプロジェクト作成
PlatformIOでプロジェクトを作成します。
【STEP2】ライブラリをインストールしよう
PlatformIOのコマンドラインからthingpulse/ESP8266 and ESP32 OLED driver for SSD1306 displaysをインストールします。
platformio lib install 2978GitHubにはIDを指定してインストールする方法が記載されていましたが、もちろんPlatformIOのページにある通り、ライブラリの名前を指定してインストールしてもOKです。
pio lib install "thingpulse/ESP8266 and ESP32 OLED driver for SSD1306 displays@^4.2.1"【STEP3】ESP32とディスプレイを接続しよう
OLEDディスプレイ(SSD1306)はESP32に接続しなければ動きません。当然なんだけど、たまに忘れる(^^;)
OLEDとの通信はI2C通信により行います。ESP32の21にSDA、22にSCLを接続、VCCには3.3V、GNDにはGNDを接続するだけでOKです。
| ESP32(GPIO) | OLED(SSD1306) |
|---|---|
| 21 | SDA |
| 22 | SCL |
| 3.3V | VCC |
| GND | GND |
なお、プルアップは不要です。抵抗と接続してプルアップするように推奨しているサイトが多いですが、ESP32はプルアップ回路まで内蔵していますので、自分で回路を組む必要はありません。I2Cに限らず、ボタン回路などを作るときのプルアップもESP32側でできてしまいます。
【STEP4】サンプルを動かしてみよう!
GitHubにサンプルが掲載されているので、試しに動かしてみましょう。
examplesフォルダにいくつかのサンプルが用意されていますが、今回はSSD1306DrawingDemoを動作させてみます。examples/SSD1306DrawingDemo/SSD1306DrawingDemo.inoをコピーして、PlatformIOのプロジェクトのsrc/main.cppにすべてコピペします。
動作結果はこのあと動画で紹介していますので、お楽しみに!
/**
   The MIT License (MIT)
   Copyright (c) 2018 by ThingPulse, Daniel Eichhorn
   Copyright (c) 2018 by Fabrice Weinberg
   Permission is hereby granted, free of charge, to any person obtaining a copy
   of this software and associated documentation files (the "Software"), to deal
   in the Software without restriction, including without limitation the rights
   to use, copy, modify, merge, publish, distribute, sublicense, and/or sell
   copies of the Software, and to permit persons to whom the Software is
   furnished to do so, subject to the following conditions:
   The above copyright notice and this permission notice shall be included in all
   copies or substantial portions of the Software.
   THE SOFTWARE IS PROVIDED "AS IS", WITHOUT WARRANTY OF ANY KIND, EXPRESS OR
   IMPLIED, INCLUDING BUT NOT LIMITED TO THE WARRANTIES OF MERCHANTABILITY,
   FITNESS FOR A PARTICULAR PURPOSE AND NONINFRINGEMENT. IN NO EVENT SHALL THE
   AUTHORS OR COPYRIGHT HOLDERS BE LIABLE FOR ANY CLAIM, DAMAGES OR OTHER
   LIABILITY, WHETHER IN AN ACTION OF CONTRACT, TORT OR OTHERWISE, ARISING FROM,
   OUT OF OR IN CONNECTION WITH THE SOFTWARE OR THE USE OR OTHER DEALINGS IN THE
   SOFTWARE.
   ThingPulse invests considerable time and money to develop these open source libraries.
   Please support us by buying our products (and not the clones) from
   https://thingpulse.com
*/

// Include the correct display library
// For a connection via I2C using Wire include
#include <Wire.h>        // Only needed for Arduino 1.6.5 and earlier
#include "SSD1306Wire.h" // legacy include: `#include "SSD1306.h"`
// or #include "SH1106Wire.h", legacy include: `#include "SH1106.h"`
// For a connection via I2C using brzo_i2c (must be installed) include
// #include <brzo_i2c.h> // Only needed for Arduino 1.6.5 and earlier
// #include "SSD1306Brzo.h"
// #include "SH1106Brzo.h"
// For a connection via SPI include
// #include <SPI.h> // Only needed for Arduino 1.6.5 and earlier
// #include "SSD1306Spi.h"
// #include "SH1106SPi.h"

// Use the corresponding display class:

// Initialize the OLED display using SPI
// D5 -> CLK
// D7 -> MOSI (DOUT)
// D0 -> RES
// D2 -> DC
// D8 -> CS
// SSD1306Spi        display(D0, D2, D8);
// or
// SH1106Spi         display(D0, D2);

// Initialize the OLED display using brzo_i2c
// D3 -> SDA
// D5 -> SCL
// SSD1306Brzo display(0x3c, D3, D5);
// or
// SH1106Brzo  display(0x3c, D3, D5);

// Initialize the OLED display using Wire library
SSD1306Wire display(0x3c, SDA, SCL); // ADDRESS, SDA, SCL  -  SDA and SCL usually populate automatically based on your board's pins_arduino.h e.g. https://github.com/esp8266/Arduino/blob/master/variants/nodemcu/pins_arduino.h
// SH1106Wire display(0x3c, SDA, SCL);

// Adapted from Adafruit_SSD1306
void drawLines()
{
  for (int16_t i = 0; i < display.getWidth(); i += 4)
  {
    display.drawLine(0, 0, i, display.getHeight() - 1);
    display.display();
    delay(10);
  }
  for (int16_t i = 0; i < display.getHeight(); i += 4)
  {
    display.drawLine(0, 0, display.getWidth() - 1, i);
    display.display();
    delay(10);
  }
  delay(250);

  display.clear();
  for (int16_t i = 0; i < display.getWidth(); i += 4)
  {
    display.drawLine(0, display.getHeight() - 1, i, 0);
    display.display();
    delay(10);
  }
  for (int16_t i = display.getHeight() - 1; i >= 0; i -= 4)
  {
    display.drawLine(0, display.getHeight() - 1, display.getWidth() - 1, i);
    display.display();
    delay(10);
  }
  delay(250);

  display.clear();
  for (int16_t i = display.getWidth() - 1; i >= 0; i -= 4)
  {
    display.drawLine(display.getWidth() - 1, display.getHeight() - 1, i, 0);
    display.display();
    delay(10);
  }
  for (int16_t i = display.getHeight() - 1; i >= 0; i -= 4)
  {
    display.drawLine(display.getWidth() - 1, display.getHeight() - 1, 0, i);
    display.display();
    delay(10);
  }
  delay(250);
  display.clear();
  for (int16_t i = 0; i < display.getHeight(); i += 4)
  {
    display.drawLine(display.getWidth() - 1, 0, 0, i);
    display.display();
    delay(10);
  }
  for (int16_t i = 0; i < display.getWidth(); i += 4)
  {
    display.drawLine(display.getWidth() - 1, 0, i, display.getHeight() - 1);
    display.display();
    delay(10);
  }
  delay(250);
}

// Adapted from Adafruit_SSD1306
void drawRect(void)
{
  for (int16_t i = 0; i < display.getHeight() / 2; i += 2)
  {
    display.drawRect(i, i, display.getWidth() - 2 * i, display.getHeight() - 2 * i);
    display.display();
    delay(10);
  }
}

// Adapted from Adafruit_SSD1306
void fillRect(void)
{
  uint8_t color = 1;
  for (int16_t i = 0; i < display.getHeight() / 2; i += 3)
  {
    display.setColor((color % 2 == 0) ? BLACK : WHITE); // alternate colors
    display.fillRect(i, i, display.getWidth() - i * 2, display.getHeight() - i * 2);
    display.display();
    delay(10);
    color++;
  }
  // Reset back to WHITE
  display.setColor(WHITE);
}

// Adapted from Adafruit_SSD1306
void drawCircle(void)
{
  for (int16_t i = 0; i < display.getHeight(); i += 2)
  {
    display.drawCircle(display.getWidth() / 2, display.getHeight() / 2, i);
    display.display();
    delay(10);
  }
  delay(1000);
  display.clear();

  // This will draw the part of the circel in quadrant 1
  // Quadrants are numberd like this:
  //   0010 | 0001
  //  ------|-----
  //   0100 | 1000
  //
  display.drawCircleQuads(display.getWidth() / 2, display.getHeight() / 2, display.getHeight() / 4, 0b00000001);
  display.display();
  delay(200);
  display.drawCircleQuads(display.getWidth() / 2, display.getHeight() / 2, display.getHeight() / 4, 0b00000011);
  display.display();
  delay(200);
  display.drawCircleQuads(display.getWidth() / 2, display.getHeight() / 2, display.getHeight() / 4, 0b00000111);
  display.display();
  delay(200);
  display.drawCircleQuads(display.getWidth() / 2, display.getHeight() / 2, display.getHeight() / 4, 0b00001111);
  display.display();
}

void printBuffer(void)
{
  // Initialize the log buffer
  // allocate memory to store 8 lines of text and 30 chars per line.
  display.setLogBuffer(5, 30);

  // Some test data
  const char *test[] = {
      "Hello",
      "World",
      "----",
      "Show off",
      "how",
      "the log buffer",
      "is",
      "working.",
      "Even",
      "scrolling is",
      "working"};

  for (uint8_t i = 0; i < 11; i++)
  {
    display.clear();
    // Print to the screen
    display.println(test[i]);
    // Draw it to the internal screen buffer
    display.drawLogBuffer(0, 0);
    // Display it on the screen
    display.display();
    delay(500);
  }
}

void setup()
{
  display.init();

  // display.flipScreenVertically();

  display.setContrast(255);

  drawLines();
  delay(1000);
  display.clear();

  drawRect();
  delay(1000);
  display.clear();

  fillRect();
  delay(1000);
  display.clear();

  drawCircle();
  delay(1000);
  display.clear();

  printBuffer();
  delay(1000);
  display.clear();
}

void loop() {}
↑ソースコードを貼っておきましたので、こちらをコピペしてもらってもOK
実行してみよう!
ソースコードをコピペしたら、ビルドしてESP32にアップロードします。
さあ動いてくれますでしょうか!?
しっかり動いてくれました!よかった!
基本的な使いかた
基本となるソースコードは次のようになります。
#include <Wire.h>
#include "SSD1306Wire.h"
SSD1306Wire display(0x3c, SDA, SCL);
void setup()
{
//初期化する
display.init();
//ここで処理をする
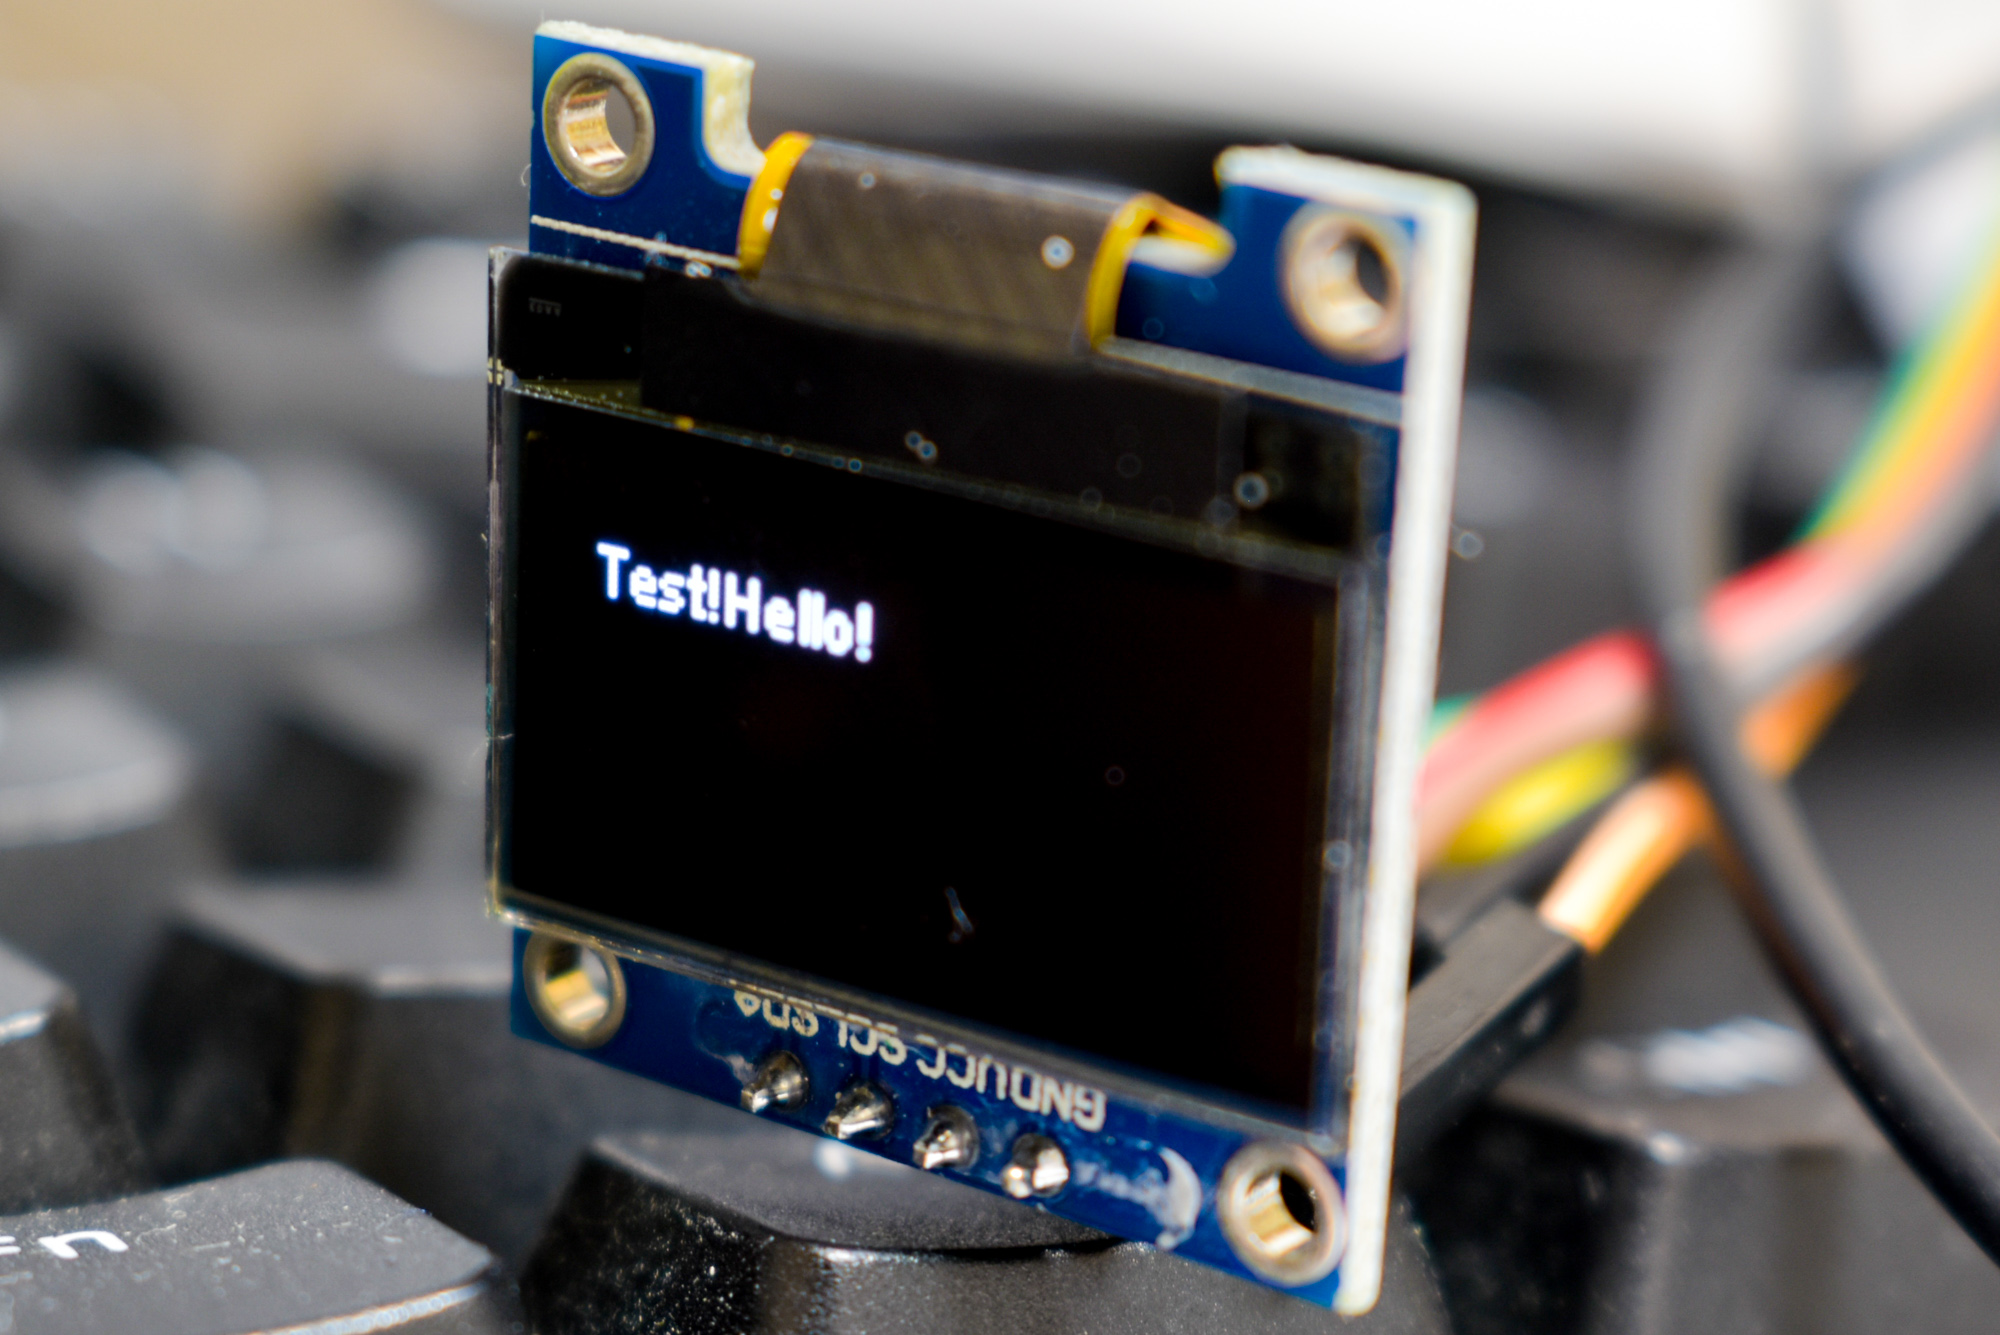
display.drawString(10,10,"Test!Hello!");
//表示する
display.display();
//バッファをクリア
display.clear();
}
void loop() {}はじめにSSD1306Wire型の変数displayを定義します。コンストラクタにディスプレイのI2CアドレスとSDA、SCLのGPIOピン番号を渡しておきます。
I2Cアドレスはほとんどのケースで0x3cとなっています。SSD1306の基盤上にシルク印刷されていますので、万が一動作しないときは確認してみるとよいかもしれません。ピンについては特別な場合を除き、SDA、SCLと指定しておけばOKです。自動的にGPIO21と22がディスプレイとの接続に使用できるようになります。
あとはsetupでdisplay.initを呼び出し、初期化すれば表示できるようになります。変数displayがバッファとして働き、display.display()を呼び出すとデータがOLEDに転送され、実際に表示がされます。基本はこれだけで、非常にかんたんに表示を行うことが出来ます。
なお、表示後にdisplay.clear()はバッファ(display変数)をクリアするという意味です。表示を消去するにはdisplay.resetDisplay()を実行します。
よく使うサンプルコード集
よく使うサンプルコードをまとめておきます。
文字を表示する
指定した座標に文字を表示したいときのサンプルです。display.drawStringを使用します。
display.drawString(10,10,"Test!Hello!");実行すると、(x,y)=(10,10)の座標にTest!Hello!と表示します。
文字の寄せ方はdisplay.setTextAlignmentで指定できます。
display.setTextAlignment(TEXT_ALIGN_CENTER)アンカーポイントを文字列のどこにするか、以下から指定することができます。
- TEXT_ALIGN_LEFT
- TEXT_ALIGN_RIGHT
- TEXT_ALIGN_CENTER
- TEXT_ALIGN_CENTER_BOTH
バックグラウンドを白色にする
デフォルトでは黒の背景に白で描画が行われます。バックグラウンドを白色にしたいときは、display.invertDisplayを呼び出します。
display.invertDisplay();もとに戻すには、normalDisplayを呼び出します。
display.normalDisplay();なお、文字色は自動的に変化しないため、setColorを使って手動で変更する必要があります。
フォント・フォントサイズを変える
setFontを実行すると、テキスト描画に使用するフォントを変更することができます。なお、フォントサイズの変更もフォントの変更で行います。
void setFont(const uint8_t* fontData);フォントは次のページで作成できますので、あわせて確認してみることをおすすめします。

画像を描画する
画像を描画することもできます。あらかじめ画像ファイルをXBM形式に変換しておき、ソースコードなどに埋め込んでおけば、任意の画像をOLEDに表示させることができます。
void drawXbm(int16_t x, int16_t y, int16_t width, int16_t height, const uint8_t *xbm);こちらのサイトでXBM形式への変換が行えます。

画面を点滅させる
loopでnormalDisplayとinvertDisplayを繰り返すことにより、画面を点滅させることが出来ます。
void loop()
{
  delay(800);
  display.normalDisplay();
  delay(800);
  display.invertDisplay();
}
delayにより一定時間(ここでは800ms)待機させることで、ディスプレイを目立たせることが可能です。エラー表示などに使用できるかもしれません。
描画色の変更
display.setColorを使用すると、文字などの描画に使用する色を変更できます。
display.setColor(BLACK);すべての表示を消す
一度すべての表示を消したいときは、display.resetDisplayを呼び出します。
display.resetDisplay();呼び出すだけですべての表示が消去されます。display.displayの呼び出しは不要です。
ディスプレイを上下逆にする
display.flipScreenVertically();左右反転して表示する
display.mirrorScreen();まとめ
いかがでしたか?ESP32を使って、かんたんにOLEDディスプレイへ表示することが出来ました。
意外な落とし穴はライブラリの選定でしょう。安価で広く普及しているSSD1306だからこそ、さまざまなメーカーがライブラリを開発しているようです。その反面、信頼性の低いライブラリやネット情報が氾濫しており、不確かな情報のためにバグに悩まされることがありえます。当記事の方法を使っていただければ、確実にディスプレイを動作させることができると思いますので、参考にしてみてください。


コメント